Introduction
I’ve noticed half a dozen blog articles, and Cisco technical articles on configuring Secure SCCP Media Resources on a Gateway, or configuring Gateways for SIP-TLS, however one thing seems constant in these how-to articles: They are using either Self-Signed certificates, or using Cisco IOS CA Servers to issue the certificates.
What if you are actually wanting to use your Corporate 3rd Party Certificate Authority to issue certificates to UC Applications and to Gateways?
What if you don’t want to manually issue and install certificates but take advantage of SCEP (Simple Certificate Enrollment Protocol) to quickly issue certificates and request new certificates automatically when the old certificates are due to expire?
If the UC Environment is large with 200+ Voice Gateways (PSTN and Analogue) all requiring a combination of Secure SCCP Media Resources, Secure SCCP Endpoint Registration or SIP TLS Signalling, then it hardly makes sense to be managing certificates manually, let alone uploading hundreds of Callmanager-Trust certificates to CUCM. This led me to a lot of investigation, trial and error, and referencing dozens of different articles – Cisco based, Microsoft based, etc. to come up with a more scalable solution.
Overview
Components used:
- Microsoft Windows Server 2012 with the Certificate Authority Role, and the Network Device Enrollment Service role
- Cisco ISR G2 Voice Gateway
- Cisco Unified Communications Manager (version independent)
Background Information
Overview of Simple Certificate Enrolment Protocol (SCEP):
Microsoft Network Device Enrolment Service (Microsoft’s implementation of SCEP):
Summary of Steps
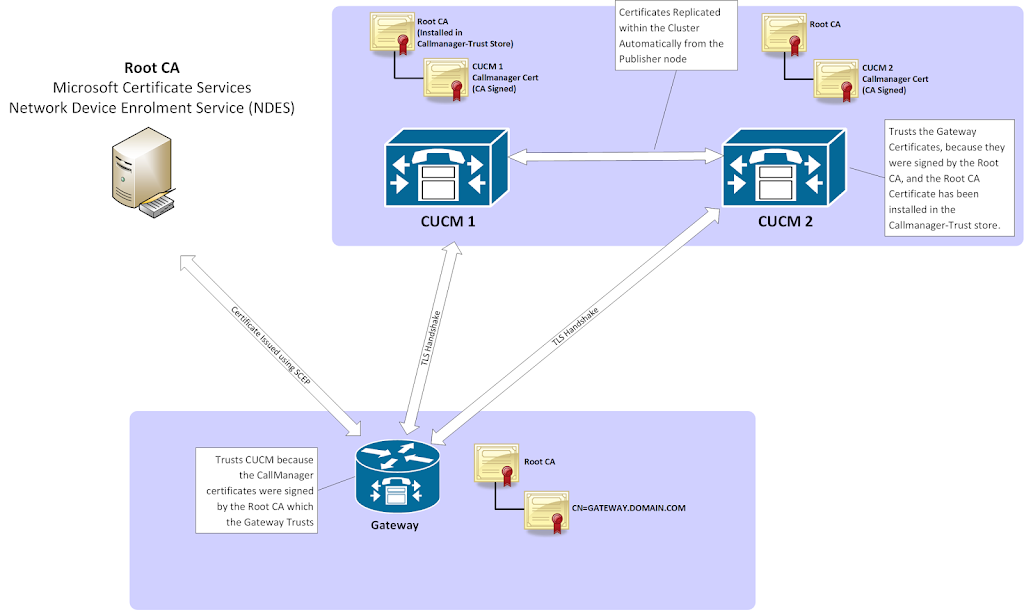
- 3rd Part Root CA Certificate Installed to CUCM in CallManager-Trust store(Only needs to be done once)
- CSR generated on all CUCM nodes for the Callmanager Certificate, certificate issued by Root CA and installed on all CUCM nodes (Only needs to be done once)
- A new Gateway which requires a certificate for Secure SCCP or SIP TLS authenticates and enrols with the CA, and automatically downloads the Root CA Certificate, requests a new certificate, receives the new certificate and installs it. – Required for every new gateway added

On to the configuration! (Disclaimer – I am a CCIE Collaboration, not a Windows Specialist, take the Windows Side of this configuration with a grain of salt!)
Windows Certificate Authority and SCEP Configuration
- Create Service Account for SCEP. Add to the Local Administrators Group of the server you’re about to install the CA and NDES roles on. This is required as the user account needs the “log onto the computer” right. Also add to the IIS_IUSRS Group. I used SCEPSvc as the account name.
- Install the Certificate Authority Role
- You will likely be prompted to install additional features (Certification Authority Services Tools, etc).
- Under Role Services also install Network Device Enrollment Service
- You will also be prompted to install additional features required for NDES (IIS, etc)
- Configure Certificate Authority. After deployment, you will need to configure the Certificate Authority.
- In the first prompt, provide a user account that is a member of the Enterprise Admins group to configure the role.
- You can’t configure NDES and CA Roles at the same time, you have to first do the CA role, so select only Certification Authority
- Select Enterprise CA
- Select Root CA
- SelectCreate a new private key
- Specify the key length and hash algorithm for the private key. I selected the default length of 1024 and hash algorithm of SHA1.Note: I initially tried choosing a larger key size and hash algorithm (2048 and SHA512), however then ran into issues with SCCP resource registration. After looking at packet captures on the CUCM during TLS negotiation, I saw TLS decrypt errors. After consulting documentation I found that CUCM only started supporting SHA256 in version 10.0, and my version was older than this so I ended up having to regenerate my private key to get my issued certificates to work.
- Specify the common name of the CA. I was happy with the default, however you might want to make it something more meaningful (“Company X Root CA” for example).
- Specify the validity of the certificate. I increased from the default of 5 years to 10 years.
- Certificate Database location – I left as default.
- After completion, you’ll get a prompt to configure additional role services, which you will want to do for NDES.
- Configure the NDES role.
- Again, you will need to provide a user in the Enterprise Admins group to configure the role.
- Select the Network Device Enrollment Servicerole
- Specify the Service Account that you created earlier (i.e. SCEPSvc). If the account is missing any required privileges, you’ll be notified.
- Specify the Registration Authority information – I used the default settings here.
- Specify the Cryptographic Service Providers – I left this as the default (2048 bit key length)
- Modify Registry Entry HKLMSYSTEMCurrentControlSetServicesCertSvcConfigurationCA-HOSTNAME and change the ValidityPeriodUnits to 5. Important: If you do not change this, all certificates you issue, regardless of the template settings, will only be valid for 2 years.
- Next you’ll need to create a template that you want to be used for your Voice Gateways that request their certificates using SCEP.IMPORTANT: You won’t have much success using the default IP Sec template, as CUCM requires both the Server Authentication and Client Authentication. I found this out the hard way, looking at packet captures from the CUCM to find there were errors that required extensions were missing. Some Googling led me here. Awinter2’s response was what made me look into this further: https://supportforums.cisco.com/discussion/11629296/creating-sip-tls-trunk-between-cucm-and-vcs-using-ca-signed-certificate
- Go to the Certification Authority MMC, right click on Certificate Templatesand select Manage
- Scroll down to the Web Server template, right click and Duplicate
- In the General tab, give the Template a meaningful display name. I called mine Voice Gateway. This automatically fills in the Template Name field – take note of this field (normally just the display name without spaces or punctuation), as you’ll need it later.
- I also adjusted the validity period to 5 years.
- Go to the Security tab and add the Service Account you added earlier. I granted the Read, Enroll and Autoentroll permissions.
- Go to the Extensions tab and under Application Policies edit, and add Client Authentication.
- Apply the changes to the template, and exit the Template Management window.
- Right click on the Certificate Templatesfolder again, and choose New > Certificate Template to Issue.
- Select the Template you created from the list, in my case Voice Gateways.
- Edit the default SCEP Certificate Templates in the Registry.
- Open regedit as Administrator, and browse to the key HKLMSoftwareMicrosoftCryptographyMSCEP
- Modify the EncryptionTemplate, GeneralPurposeTemplate and SignatureTemplate keys to match the Template Name you created earlier (Step 6.) c.) – no spaces, no punctuation).
- With the default settings, in order to issue a certificate from a device, you need to browse to the Certificate Admin URL and generate a one-time password every time. Since I wanted to script the installation of certificates over a time period, I enabled the UseSinglePassword key, so that the password can be used multiple times and does not expire. To do this, browse to HKLMSoftwareMicrosoftCryptographyMSCEPUseSinglePasswordand modify the UseSinglePassword key value from 0 to 1.
After staging a number of gateways, I would revert this setting back to ‘0’, meaning a new password is required each time. - Modify the Application Pool for SCEP in IIS.Note: I’m not certain if this step is actually required (like I said, I’m no Windows Expert), but in the document I was referring to: https://blog.gsec.se/2015/10/06/ndes-deployment-and-troubleshooting/ it had these steps, so I’ve included them. If you choose not to follow these steps, you’ll still likely need to stop the Application Pool and restart the CA role – I found my registry changes wouldn’t take effect until I’d done this.
- Go to IIS Manager > Application Pools, right click on SCEP and go to Advanced Settings.
- Set the Load User Profile attribute to True and click OK.
- Stop the Application Pool from the right click menu on SCEP
- Log off the server as Administrator
- Log onto the server using the SCEPSvc account, then log off again.
- Logon again as administrator.
- Start the Application Pool again.
- Restart IIS (from a powershell command prompt, type iisreset). This is necessary for your Registry changes to take effect.
- Once all of that is complete, try to reach the SCEP Admin URL. It’ll be in the form http://hostname/certsrv/mscep_admin
- You should reach a webpage with the enrollment challenge password and if you set the UseSinglePassword key to 1, it should also say that the password can be used multiple times and does not expire.
- Download the Root CA Certificate. There’s many was to do this, but I just opened any of the certificates in the Certification Authority MMC Snap-In, went to the certificate chain, and opened the Root CA Certificate there, and exported to cer (Base-64 Format!). You’ll need this Certificate to upload to the Callmanager-Trust store.
Windows Certificate Authority Web Enrollment Service Configuration
To issue CA Signed CallManager Certificates for each server, you can also activate the Web Enrollment Service. As there are likely dozens of articles already covering this, I’m just going to go through a few extra things that I needed to do.

- Install Certificate Web Enrollment Service Role
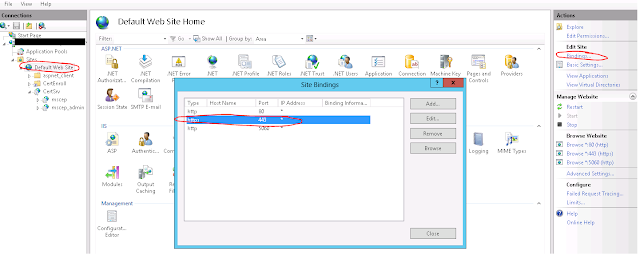
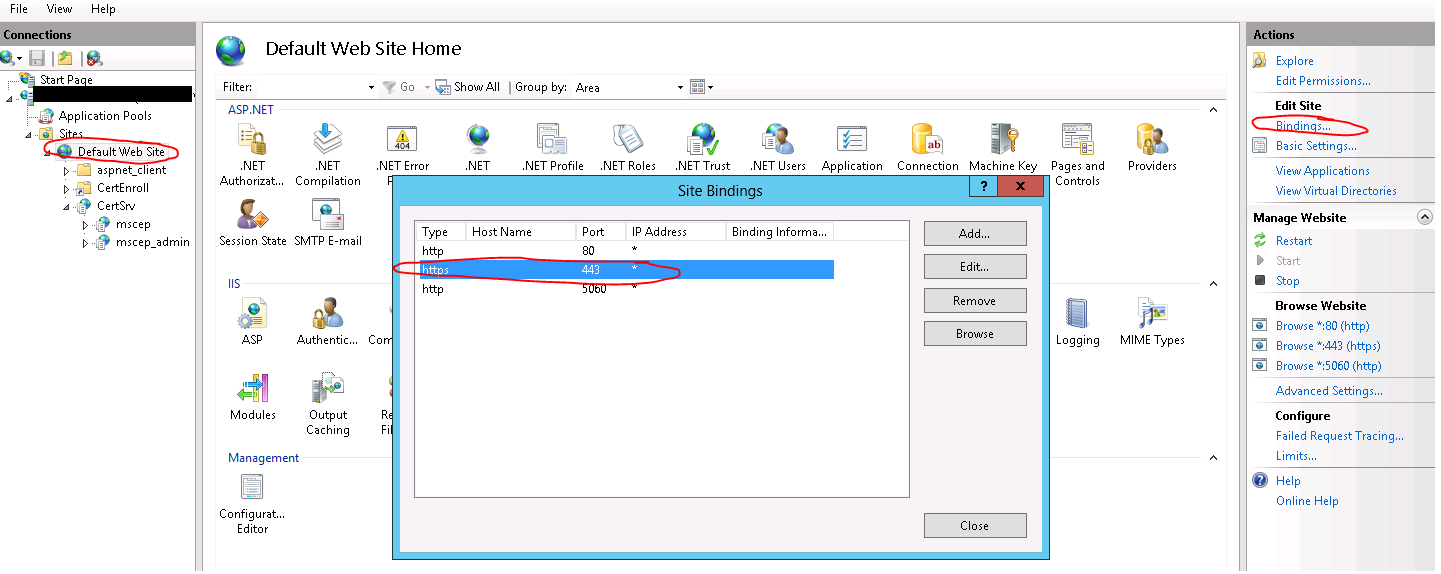
- Activate SSL for in IIS Setup (Default Web Site > Bindings)
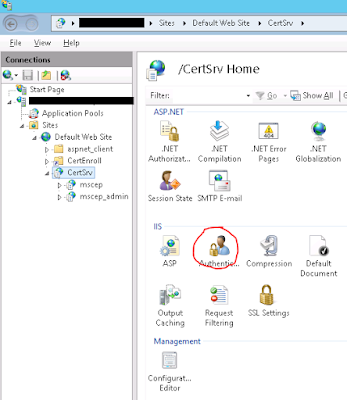
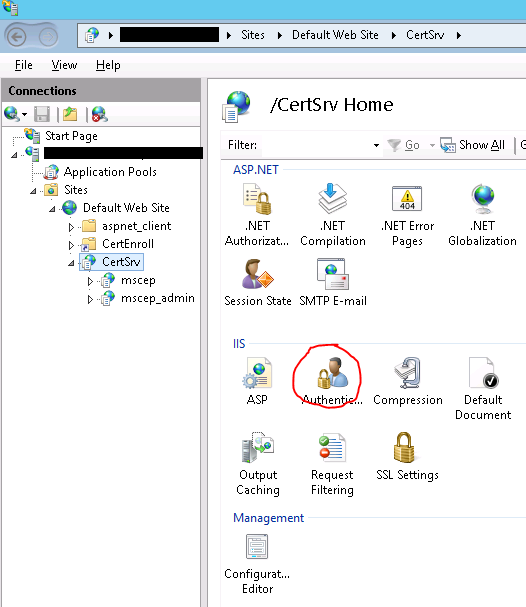
- Disable Anonymous Authentication. Without doing this, you’ll never have access to your Certificate Templates because the anonymous login doesn’t have rights to them (rightfully so).

- Give a Group (i.e. Domain Admins, or another more specific group) permissions to enrol using the created Certificate Templates, namely Voice Gateway and Web.
CUCM Certificate Installation
WARNING: Changing your CallManager Certificate on a mixed-mode cluster will result in no secure telephones being able to register until you update the CTL file. This will also prevent any secure communication between any existing Secure SCCP Media Resources, or over SIP TLS Trunks until you ensure all certificates are trusted among devices or other clusters. Only continue with this if you have a clear understanding of the implications of your actions.
- Upload the CA Root Certificate to the CallManager-Trust store (Only required on the Publisher Node)
- Go to OS Administration > Security > Certificate Management
- Click Upload Certificate
- Choose the Root CA Certificate and upload this to the CallManager-Trust store
- Generate a CSR (Required for all Call Processing Nodes)
- Go to OS Administration > Security > Certificate Management
- Click Generate CSR and select CallManager
- Download the CSR
- Enrol with Root CA (Required for all Call Processing Nodes)
- Browse to the Certificate Web Enrollment Page and paste in your CSR.
- If you used a user account with the enrol permission, you should just be able to download your certificate directly from the page. Otherwise you will need to go into Certificate Authority MMC Snap-in and issue and download the certificate there.
- Install Certificate on CUCM node (required for all Call Processing Nodes)
- Go to OS Administration > Security > Certificate Management
- Click Upload Certificate
- Specify the CA Signed Certificate. Also enter in the Root Certificate that you uploaded in Step 1.
- Restart the CallManager Service (Warning: Disruptive to Endpoints!!)
- Update CTL File (https://supportforums.cisco.com/document/73611/ip-phone-security-and-ctl-certificate-trust-list)
- Upload the CA Root Certificate to the CallManager-Trust store on any other Clusters that you are using TLS communication with (i.e. SIP Trunk to an SME Cluster)
Here is a post that goes into some more detail with screenshots for Certificate Management. It’s for Tomcat certificates, but the procedure is the same for other types of Certificates.
Next Steps….
To be covered in my next blog article – Part 2 (Gateway Secure SCCP)